การติดตั้ง WYSIWYG Editor TinyMCE
2010-06-12 Games 5,990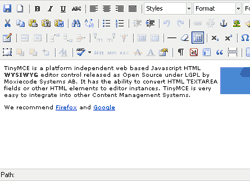
สำหรับเว็บไซต์ที่มีระบบจัดการข้อมูลข่าวสาร อย่างเช่นเว็บ CMS ทั่วๆไป มักจะมี WYSIWYG Editor ติดตั้งมาด้วย เพื่อความสะดวกในการพิมพ์ข้อมูลผ่านทางหน้าเว็บไซต์ได้โดยตรง ด้วยความที่หน้าตาของมันจะคล้ายๆกับ MS Word ทำให้ผู้ใช้เกิดความรู้สึกว่าคุ้นเคย ( แม้จะใช้งานยากกว่านิดหน่อย ) และสะดวกกว่าการเขียน tag HTML เอาเองครับ
วันนี้จะมาสาธิตวิธีการติดตั้งและใช้งาน TinyMCE ซึ่งเป็น WYSIWYG Editor เจ้าหนึ่งที่ให้เราใช้ได้ฟรีครับ
ขั้นแรก ให้ไป Download TinyMCE ได้ที่ http://tinymce.moxiecode.com เมื่อได้มาแล้วให้แตก zip ออกมาไฟล์ที่เราจะต้องนำไปใช้จะอยู่ใน Folder tiny_mce ทั้งหมดครับ ให้ยกไปทั้ง Folder ไปวางใน directory ที่ต้องการได้เลย
ขั้นที่สอง เรียกใช้งาน TinyMCE การเรียกใช้งาน TinyMCE ง่ายมากครับเพียงแค่กำหนด path ที่อยู่ ของไฟล์ให้ถูกต้องดังตัวอย่างนี้ครับ
<script type="text/javascript" src="/tiny_mce/tiny_mce.js"></script>
<script type="text/javascript">
	tinyMCE.init({
		mode : "textareas",
		theme : "simple"
	});
</script>
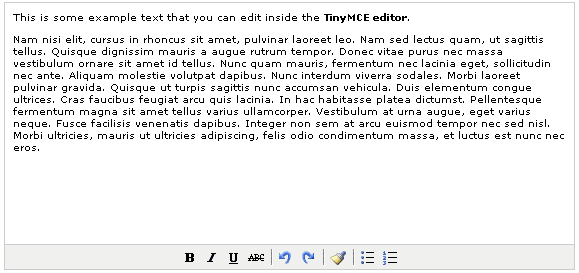
โดยที่นำ Script ด้านบนไปวางไว้ในหน้าที่เราใช้ Form สำหรับกรอกข้อมูล โดยตัว TinyMCE จะไปแสดงผลกับทุกส่วนของ Textarea ในหน้านั้นดังรูปด้านล่าง ซึ่งเป็นตัวอย่างการเรียกใช้ theme simple ซึ่งเราเรียกใช้ผ่าน tinyMCE.init ตามโค๊ดทางด้านบนครับ
หากเรายังเซตค่าใน tinyMCE.init ยังไม่เป็นนัก ก็สามารถเลือกใช้จากไฟล์ตัวอย่างที่เค้าจัดเตรียมไว้ให้ก็ได้ครับ โดยการไปเปิดไฟล์ตัวอย่างและ view source ดูค่าที่กรอกไว้ใน tinyMCE.init นำมาใช้โดยต้องระวังเรื่องที่อยู่ของไฟล์ให้ถูกต้องด้วยครับ
สำหรับ การปรับแต่งเพิ่มลดปุ่มใช้งานของ TinyMCE ก็ไม่ยากครับ ให้ลองดูจากไฟล์ตัวอย่าง full.html นะครับ
tinyMCE.init({
	// General options
	mode : "textareas",
	theme : "advanced",
	plugins : "pagebreak,style,layer,table,save,...",

	// Theme options
	theme_advanced_buttons1 : "save,newdocument,|,bold,italic,...",
	theme_advanced_buttons2 : "cut,copy,paste,pastetext,pasteword,...",
	theme_advanced_buttons3 : "tablecontrols,|,hr,removeformat,visualaid...",
	theme_advanced_buttons4 : "insertlayer,moveforward,movebackward,...",
	theme_advanced_toolbar_location : "top",
	theme_advanced_toolbar_align : "left",
	theme_advanced_statusbar_location : "bottom",
	theme_advanced_resizing : true,

	// Example content CSS (should be your site CSS)
	content_css : "css/content.css",

	// Drop lists for link/image/media/template dialogs
	template_external_list_url : "lists/template_list.js",
	external_link_list_url : "lists/link_list.js",
	external_image_list_url : "lists/image_list.js",
	media_external_list_url : "lists/media_list.js",

	// Style formats
	style_formats : [
		{title : 'Bold text', inline : 'b'},
		{title : 'Red text', inline : 'span', styles : {color : '#ff0000'}},
		{title : 'Red header', block : 'h1', styles : {color : '#ff0000'}},
		{title : 'Example 1', inline : 'span', classes : 'example1'},
		{title : 'Example 2', inline : 'span', classes : 'example2'},
		{title : 'Table styles'},
		{title : 'Table row 1', selector : 'tr', classes : 'tablerow1'}
	],

	// Replace values for the template plugin
	template_replace_values : {
		username : "Some User",
		staffid : "991234"
	}
});
จะเห็นว่ามีการกำหนดการใช้งานได้หลายรูปแบบตามใจเราเลยทีเดียว ส่วนที่สำคัญก็จะมี
General options เป็นส่วนที่กำหนดการใช้งาน TinyMCE โดยค่าที่ตั้งไว้
mode : "textareas", // กำหนดการให้ใช้งาน TinyMCE กับพื้นที่ Textareas
theme : "advanced", // กำหนดให้ผู้ใช้สามารถปรับแต่ง theme เองได้
plugins : "pagebreak,style,layer,table,save,...", // ติดตั้ง Plugins ที่ต้องการ
Theme options เป็นส่วนที่กำหนดปุ่มของ TinyMCE ตรง theme_advanced_buttons1 - 4 ก็คือปุ่มที่ติดตั้งไว้ทั้งหมด 4 แถว ซึ่งสามารถเข้าใจได้ไม่ยาก หากลบข้อความออกก็จะเป็นการลบปุ่มนั้นออกนั้นเองครับ
content_css เป็นการกำหนดให้ TinyMCE ใช้ CSS ที่เรากำหนด ซึ่งจะทำให้สามารถเห็นรูปแบบข้อความได้ตรงกับ CSS ของเว็บเราครับ
คำแนะนำเพิ่มเติม
1. หากพบปัญหาเช่น จากเครื่องหมาย "<" เป็น "<" แก้โดยการใช้ htmlspecialchars( ) ในการแสดงข้อมูลใน Textareas
2. หากติดตั้งแล้ว TinyMCE ไม่แสดงผลออกมา ให้เช็คในส่วนของ tinyMCE.init ว่าบรรทัดสุดท้ายมีการใส่ , ไว้หรือไม่ ให้เอา , ออกครับ
3. หากยังมีปัญหาที่ไม่สามารถแก้ได้ลองดู FAQs ครับ
WYSIWYG Editor,TinyMCE | Java Script


